Bomber Jackets are everywhere this season, and I'm excited to be sharing a series of hacks with you on fun changes and additions you can make to the Midway Bomber Jacket.
As soon as I started looking at bomber jackets online for inspiration (see our Pinterest board here), I noticed that many of them had zippered pockets- which add an edgy vibe and also have the benefit of keeping your items secure (I can't afford to crack the screen on my iPhone AGAIN!). So, as part of the Sewalong happening over at Pretty Posh Prints, I'm going to show you how to adjust your pattern and sew zippered pockets onto your Midway Bomber. (Need the pattern? Get it here)
Are you ready? To start, you'll need your pattern, some tracing paper, a ruler, two zippers, and a pen. I prefer the metal zippers, because they are easier to shorten. 7" should be fine. Got it? Let's go!
Step 1:
We will be using the TOP POCKET piece only here, since there won't be a welt. Grab it and your tracing paper- we are going to alter it slightly. We are going to draw in a rectangle for the zipper opening 1/2" wide and 1/2" from the top and bottom edges, and 1/2" from the straight side.
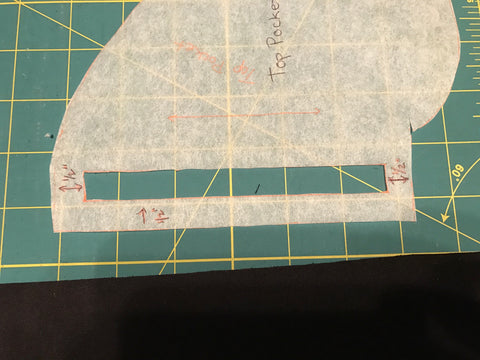
Next, cut out 4 of these, but DO NOT CUT OUT YOUR RECTANGLE yet! These should be mirror images. Iron fusible interfacing to cover the zipper opening on the wrong side of your fabric and draw in your rectangle on top of the interfacing. Line up the interfaced pockets with the markings on the front of your left and right Jacket front, right sides together.


Sew around the rectangle, as straight and accurately as possible. Cut into the rectangle, angling out at the corners. I find it helpful to put a dot where I'm going to cut toward the corners to make sure I'm not going too far. Sometimes those scissors can get out of hand!

Flip the edges and pocket to the wrong side of the front, and press well. Working from the front, use pins, wash away wonder tape, or a fabric glue stick, to put your zipper in the pocket opening with right side up and the zipper pull at the top of your pocket and the stopper at the bottom. If your zipper is too long, you will need to shorten it. See the video for doing that here.
Sew around the outside of your rectangle, attaching the zipper to the pocket from the top. Again, sew carefully and evenly, using a zipper foot. I use a slightly longer straight stitch here and needed a heavier needle to go through my scuba fabric and zipper.

Once your zipper is in, check to make sure it works! Yay! Now, you will attach the non interfaced pocket piece to the pocket you just installed, along the straight edge and all around. Finish with a serger if desired. You will have to be exact with your seam allowances, and maybe even do a 1/4" seam allowance at the top and bottom of the pocket, to make room for your zipper. If you find this too snug, you could also use a slightly larger top pocket piece to give yourself more wiggle room.


Thats it! Your pocket is finished! Do the same thing on the other side and admire your handiwork! Don't forget to keep a look out for our next hack, and post your progress photos in the sewalong!